Fldigi Setup Guide

Using Fldigi with RimuSDR on Linux

Fldigi connects to FlexRadio on Linux through RimuDAX for audio, RimuCAT for CAT control, and pavucontrol for PulseAudio routing. This guide walks through the setup in the order that works reliably on Linux.

RimuSDR · RimuDAX · RimuCAT · pavucontrol · Fldigi · PSK31 · RTTY · Olivia · MFSK

What You Will Configure

Three components of the RimuSDR suite, one Linux audio utility, and Fldigi work together: RimuSDR provides the radio connection and DAX channel, RimuDAX exposes the audio streams, RimuCAT creates a virtual serial CAT port, pavucontrol handles the PulseAudio routing, and Fldigi provides the digital mode modem.

RimuSDR

RimuSDR

Start here. Connect to the radio and enable the DAX channel on the slice you want to use.

  • Connect to the FlexRadio
  • Set the Slice DAX channel to 1
  • Press the DAX button on that slice
RimuDAX

RimuDAX

Provides the audio path. Enable TX, Mic, and RX1 channels so Fldigi can receive and transmit.

  • Connect and select the same station as RimuSDR
  • Enable TX, Mic, and RX1 channels
  • Confirm the RX1 meter responds to received signals
RimuCAT

RimuCAT

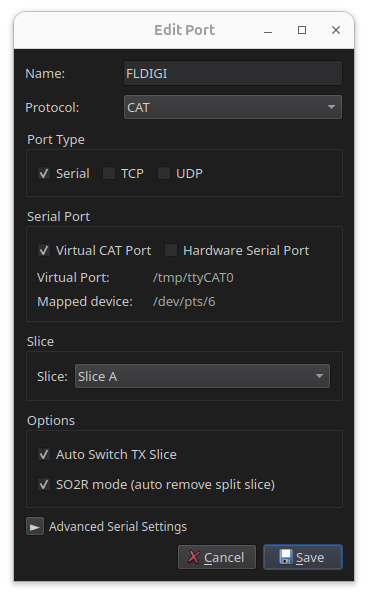
Provides the CAT control path via a virtual serial port that Fldigi connects to through Hamlib.

  • Connect and select the same station as RimuSDR
  • Create a CAT Serial connection with a Virtual CAT Port
  • Note the Mapped Device path for Fldigi configuration

pavucontrol

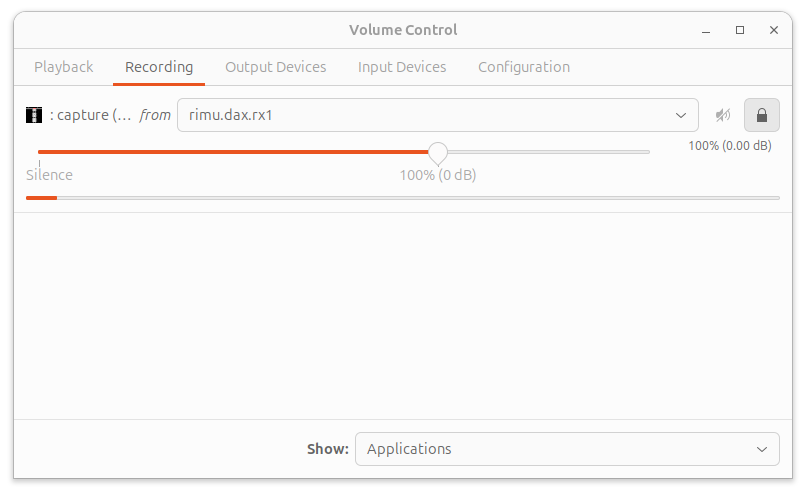
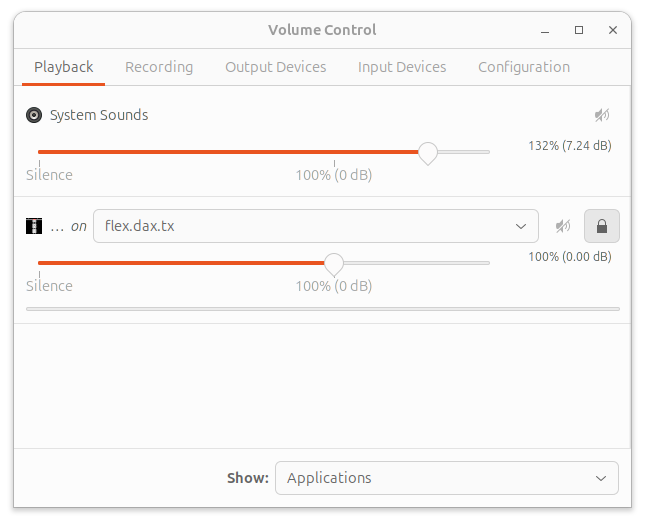
Handles Linux audio routing. Use it to connect Fldigi's PulseAudio streams to the RimuDAX RX and TX devices.

  • Install it if your distro does not already include it
  • Route Fldigi recording to rimu.dax.rx1
  • Route Fldigi playback to rimu.dax.tx if transmitting

Fldigi

Digital mode modem application. Handles encoding/decoding for PSK31, RTTY, Olivia, MFSK and other modes using audio streams.

  • Configure rig control via Hamlib
  • Set audio system to PulseAudio
  • Route audio streams using pavucontrol

Step 1 — Install pavucontrol

Before configuring Fldigi, make sure pavucontrol is installed. Many Linux distributions already include it, but if it is missing you can install it with:

sudo apt install pavucontrol
Why pavucontrol is required
  • Audio routing happens outside FldigiFldigi on Linux does not select the RimuDAX channels directly in its own device lists for this setup. The stream routing is done externally through PulseAudio using pavucontrol.
  • Usually already presentOn some distributions pavucontrol is preinstalled. If the command is already available, no extra package install is needed.
  • Used for both RX and TXIn pavucontrol you will route Fldigi's recording stream to rimu.dax.rx1, and its playback stream to rimu.dax.tx when you want to transmit.

Step 2 — RimuSDR: Connect and Enable DAX

RimuSDR must be connected to the radio and the DAX channel must be active on the slice before RimuDAX is started.

Setup steps
  • a. Start RimuSDR and connectOpen RimuSDR and connect to the FlexRadio. The radio will appear in the station list and the main SDR view will open once connected.
  • b. Set the Slice DAX channel to 1On the slice you want Fldigi to use, set the DAX channel selector to 1. This assigns audio channel 1 to that slice.
  • c. Make sure that DAX is enabledVerify that DAX is enabled on the radio. RimuDAX will pick up channel 1 when it connects.

Step 3 — RimuDAX: Enable Audio Channels

RimuDAX routes audio between the radio and the Linux audio system. Enable the TX, Mic, and RX1 channels so Fldigi has both a receive input and a transmit output.

Setup steps
  • a. Start RimuDAX and connectOpen RimuDAX and connect to the radio. Connect to the same station name as RimuSDR — in most setups there will only be one station in the list.
  • b. Enable TX, Mic, and RX1Enable the TX, Mic, and RX1 channels. These provide transmit audio out to the radio, microphone input, and the DAX channel 1 receive audio that Fldigi will decode.
  • c. Confirm RX1 is receivingCheck that the RX1 channel level meter moves in response to signals from the radio. If it is not responding, confirm the DAX button is active on the slice in RimuSDR.

Step 4 — RimuCAT: Create a Serial CAT Connection

RimuCAT creates a virtual serial port that Fldigi will use for CAT control. No physical serial cable is required.

Setup steps
  • a. Start RimuCAT and connectOpen RimuCAT and connect to the radio. As with RimuDAX, select the same station as RimuSDR.
  • b. Create a CAT Serial connectionCreate a new port.
    Assign it a name i.e. FLDIGI.
    Select the protocol CAT.
    Select the port type Serial.
    Select a Virtual CAT Port.
    It will assign a virtual port, but the Mapped Device will not yet be known (we'll reopen this dialog to find it next).
    Select the Slice that you assigned the DAX channel to (likely slice A).
    Check the boxes for Auto switch TX slice and SO2R mode.
    Don't change the Advanced Serial settings.
    Click Save.
  • c. Find the Mapped DeviceOnce saved, select the port and choose edit and find the Mapped Device that RimuCAT created. You'll need this when setting up Fldigi.
RimuCAT Serial CAT Port Configuration

Step 5 — Download RigCAT XML Files

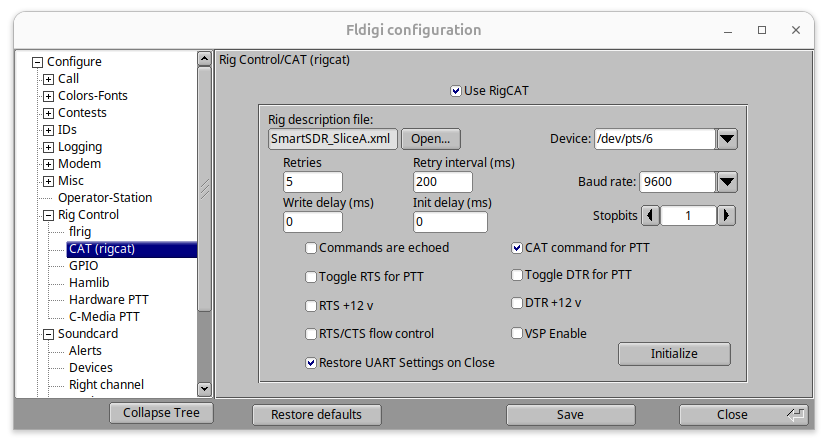
Fldigi uses RigCAT XML files to define the command protocol for different radios. Eight XML files are available for FlexRadio, one for each slice. Download the file that matches the slice you configured in Step 4.

Setup steps
  • a. Download the XML filesVisit the Fldigi FlexRadio XML files page:
    https://sourceforge.net/projects/fldigi/files/xmls/flex/
  • b. Save the files locallyDownload the XML files and save them to a directory on your computer.
    Most users will need SmartSDR_SliceA.xml since slice A is the most common choice.
    Remember the location — you'll need to reference this file in the next step.

Step 6 — Fldigi: Configuration

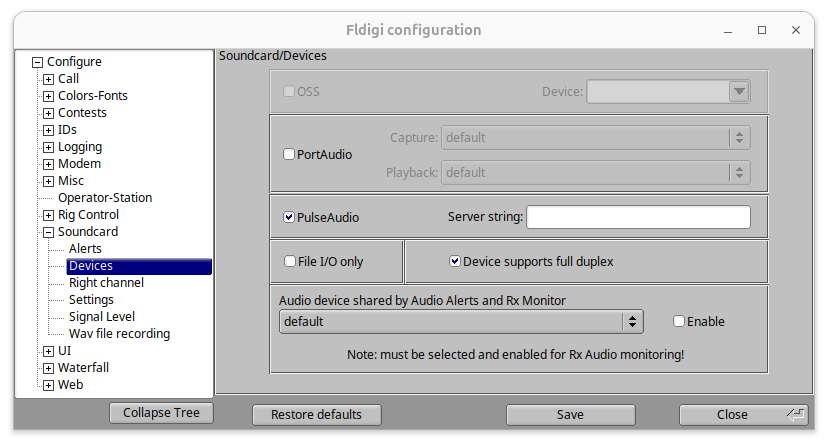
Open Fldigi and configure the audio system and rig control to connect to RimuCAT via RigCAT using the mapped serial device.

Setup steps
  • a. Open Rig Control settingsIn Fldigi go to Configure › Config Dialog.
  • b. Select PulseAudioIn the Config Dialog, find Configure > Soundcard > Devices.
    Select PulseAudio.
    Don't make any other changes.
  • c. Configure RigCATIn the Config Dialog, find Configure > Rig control > CAT (rigcat).
    Check Use RigCAT.
    Select the rig description file SmartSDR_SliceA.xml.
    Enter the Mapped device (/dev/pts/? where ? is a number) from RimuCAT and enter it into the Device. You can't select these mapped devices in the drop down.
    Select CAT command for PTT.
    Click the Initialize button.
  • d. Save and closeClick the Save button on the Config Dialog.
    Then click the Close button on the Config dialog.
Fldigi Soundcard Devices Configuration Fldigi RigCAT Configuration

Step 7 — PulseAudio Routing

Use pavucontrol to route Fldigi's audio streams to the RimuDAX virtual audio devices. This connects Fldigi's receive and transmit audio paths to the radio.

Setup steps
  • a. Route recording to rimu.dax.rx1Open pavucontrol and route Fldigi's recording stream to rimu.dax.rx1. This connects Fldigi's receive audio to the DAX RX1 stream from RimuDAX.
  • b. Route playback to rimu.dax.txRoute Fldigi's playback stream to rimu.dax.tx. This sends Fldigi's transmit audio back through RimuDAX to the radio.
PulseAudio Recording Routing with pavucontrol PulseAudio Playback Routing with pavucontrol
Need Help?
×