
Wavelog / Cloudlog Setup Guide

Using Wavelog and Cloudlog with RimuSDR on Linux

RimuCAT can talk directly to Wavelog and Cloudlog over their HTTP API. Live frequency, mode, and power updates flow into your logbook, and click-to-tune from the log returns to the radio - with no WaveLogGate or CloudlogCAT helper process required. This guide walks through the setup in order.

RimuSDR · RimuCAT · Wavelog · Cloudlog · HTTP API · Live logging · Click-to-tune

What You Will Configure

Two components of the RimuSDR suite and your logging application work together: RimuSDR provides the radio connection, RimuCAT sends radio state to your logbook and applies click-to-tune commands over the HTTP API, and Wavelog or Cloudlog receives the updates and displays them in your log.

RimuSDR

RimuSDR

Start here. Connect to the radio so RimuCAT has live frequency, mode, and power to report.

  • Connect to the FlexRadio
  • Leave RimuSDR connected while you log
RimuCAT

RimuCAT

Provides the integration. A port with the Wavelog/Cloudlog protocol talks to your logbook's HTTP API directly.

  • Connect and select the same station as RimuSDR
  • Add a port with the Wavelog/Cloudlog protocol
  • Enter the Base URL and API key

Wavelog / Cloudlog

Web-based logging application. Receives live radio state and can send a frequency back to the radio.

  • Create a read/write API key
  • Note your Base URL
  • Enable click-to-tune to QSY the radio from the log

Step 1 - RimuSDR: Connect to the Radio

RimuSDR must be connected to the radio so RimuCAT has live frequency, mode, and power to report to your logbook.

Setup steps
  • a. Start RimuSDR and connectOpen RimuSDR and connect to the FlexRadio. The radio will appear in the station list and the main SDR view will open once connected.
  • b. Keep RimuSDR runningLeave RimuSDR connected while you log. RimuCAT reads the radio's current frequency, mode, and power and reports it to your logbook - there is no slice to select for this port.

Step 2 - Wavelog / Cloudlog: Create an API Key

RimuCAT authenticates to your logbook with an API key. Create one in Wavelog or Cloudlog and note your Base URL, so RimuCAT knows where to send updates.

Setup steps
  • a. Open API key settingsSign in to your Wavelog or Cloudlog instance and open Account › API Keys.
  • b. Create a read/write keyGenerate a new API key with read/write permission. Read/write is required so RimuCAT can both push radio state and receive click-to-tune commands. Copy the key - you will paste it into RimuCAT.
  • c. Note your Base URLRecord the base URL of your instance, including the port if it uses one, for example https://log.example.com/ or http://192.168.0.241:8086/. This is the address RimuCAT sends the API requests to.

Step 3 - RimuCAT: Create a Wavelog / Cloudlog Port

RimuCAT's Wavelog/Cloudlog protocol talks to your logbook's HTTP API directly. There is no separate WaveLogGate or CloudlogCAT process to install or run.
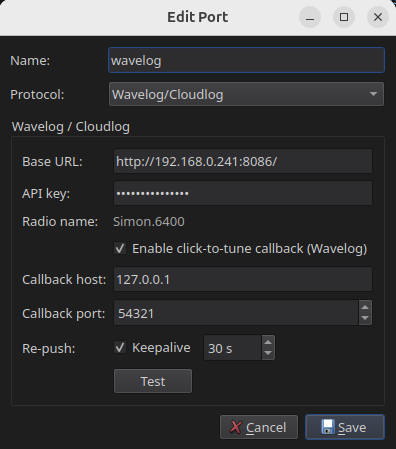
Setup steps
  • a. Start RimuCAT and connectOpen RimuCAT and connect to the radio. Select the same station that RimuSDR is connected to - in most setups there will only be one station in the list.
  • b. Add a port and set the protocolAdd a new port and set Protocol to Wavelog/Cloudlog. Give it a name i.e. wavelog.
  • c. Enter the Base URL and API keyPaste the Base URL and API key from Step 2. The Radio name is filled in automatically (shown as Simon.6400 in the example) - this is how your radio state is grouped in the logbook, so there is no slice to select.
  • d. Enable click-to-tune (optional)Check Enable click-to-tune callback (Wavelog) to QSY the radio from the log. Set the Callback host and Callback port (for example 127.0.0.1 and 54321) to an address Wavelog can reach.
  • e. Keep the connection alive (optional)Enable Re-push · Keepalive to periodically re-send the current radio state (default 30 s). This keeps your logbook in sync even when the radio has not changed.
  • f. Test and saveClick Test to confirm RimuCAT can reach your logbook, then click Save. RimuCAT begins sending live frequency, mode, and power to your logbook.
RimuCAT Wavelog/Cloudlog port configuration showing Base URL, API key, auto-filled radio name, click-to-tune callback, and keepalive

Step 4 - Verify the Integration

With the port enabled, confirm that radio state reaches your logbook and that click-to-tune returns to the radio.
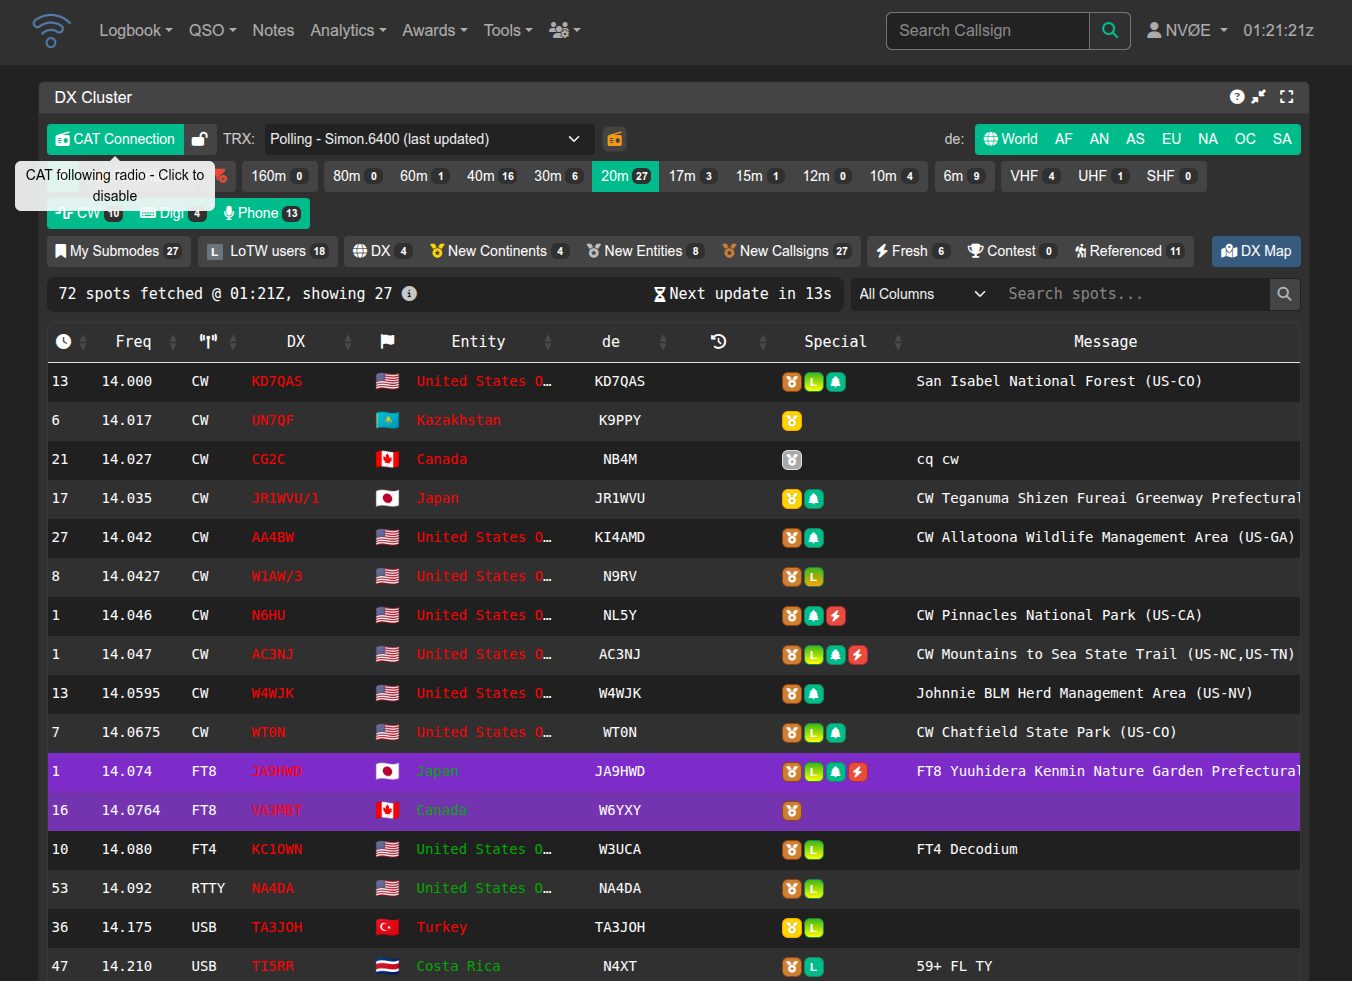
Live updates flow in
Tune the radio in RimuSDR and watch your Wavelog or Cloudlog QSO entry follow along. The frequency, band, and mode fields update automatically as you change the radio.
Click-to-tune returns
On Wavelog's DX Cluster page, click CAT Connection to connect to RimuSDR - the TRX selector should show your radio (for example Simon.6400). Then Ctrl-click a spot's frequency to tune RimuSDR to that frequency.
No helper process
Because RimuCAT speaks the HTTP API directly, there is no WaveLogGate or CloudlogCAT process to keep running alongside it.
Wavelog DX Cluster page with CAT Connection enabled and the TRX selector following Simon.6400
Setup checklist
  • RimuSDR connectedRimuSDR must be connected to the radio so RimuCAT has live radio state to report.
  • Read/write API keyThe Wavelog or Cloudlog API key must have read/write permission for both live updates and click-to-tune.
  • Base URL correctThe Base URL entered in RimuCAT must match your logbook's address, including the port if it uses one.
  • Click-to-tune callbackFor click-to-tune, enable the callback and set a Callback host and port that Wavelog can reach.
  • Same station throughoutRimuCAT must be connected to the same station (radio) as RimuSDR.
  • Tested and savedUse the Test button to confirm the connection, then save the port for updates to flow.
Need Help?
×