WSJT-X Setup Guide

Using WSJT-X with RimuSDR on Linux

WSJT-X connects to FlexRadio on Linux through two components of the RimuSDR suite: RimuDAX for audio routing and RimuCAT for CAT control. This guide walks through every step of the configuration in order.

RimuSDR · RimuDAX · RimuCAT · WSJT-X · FT8 · FT4 · JT65 · WSPR

Sending FT8 with RimuSDR on Linux

What You Will Configure

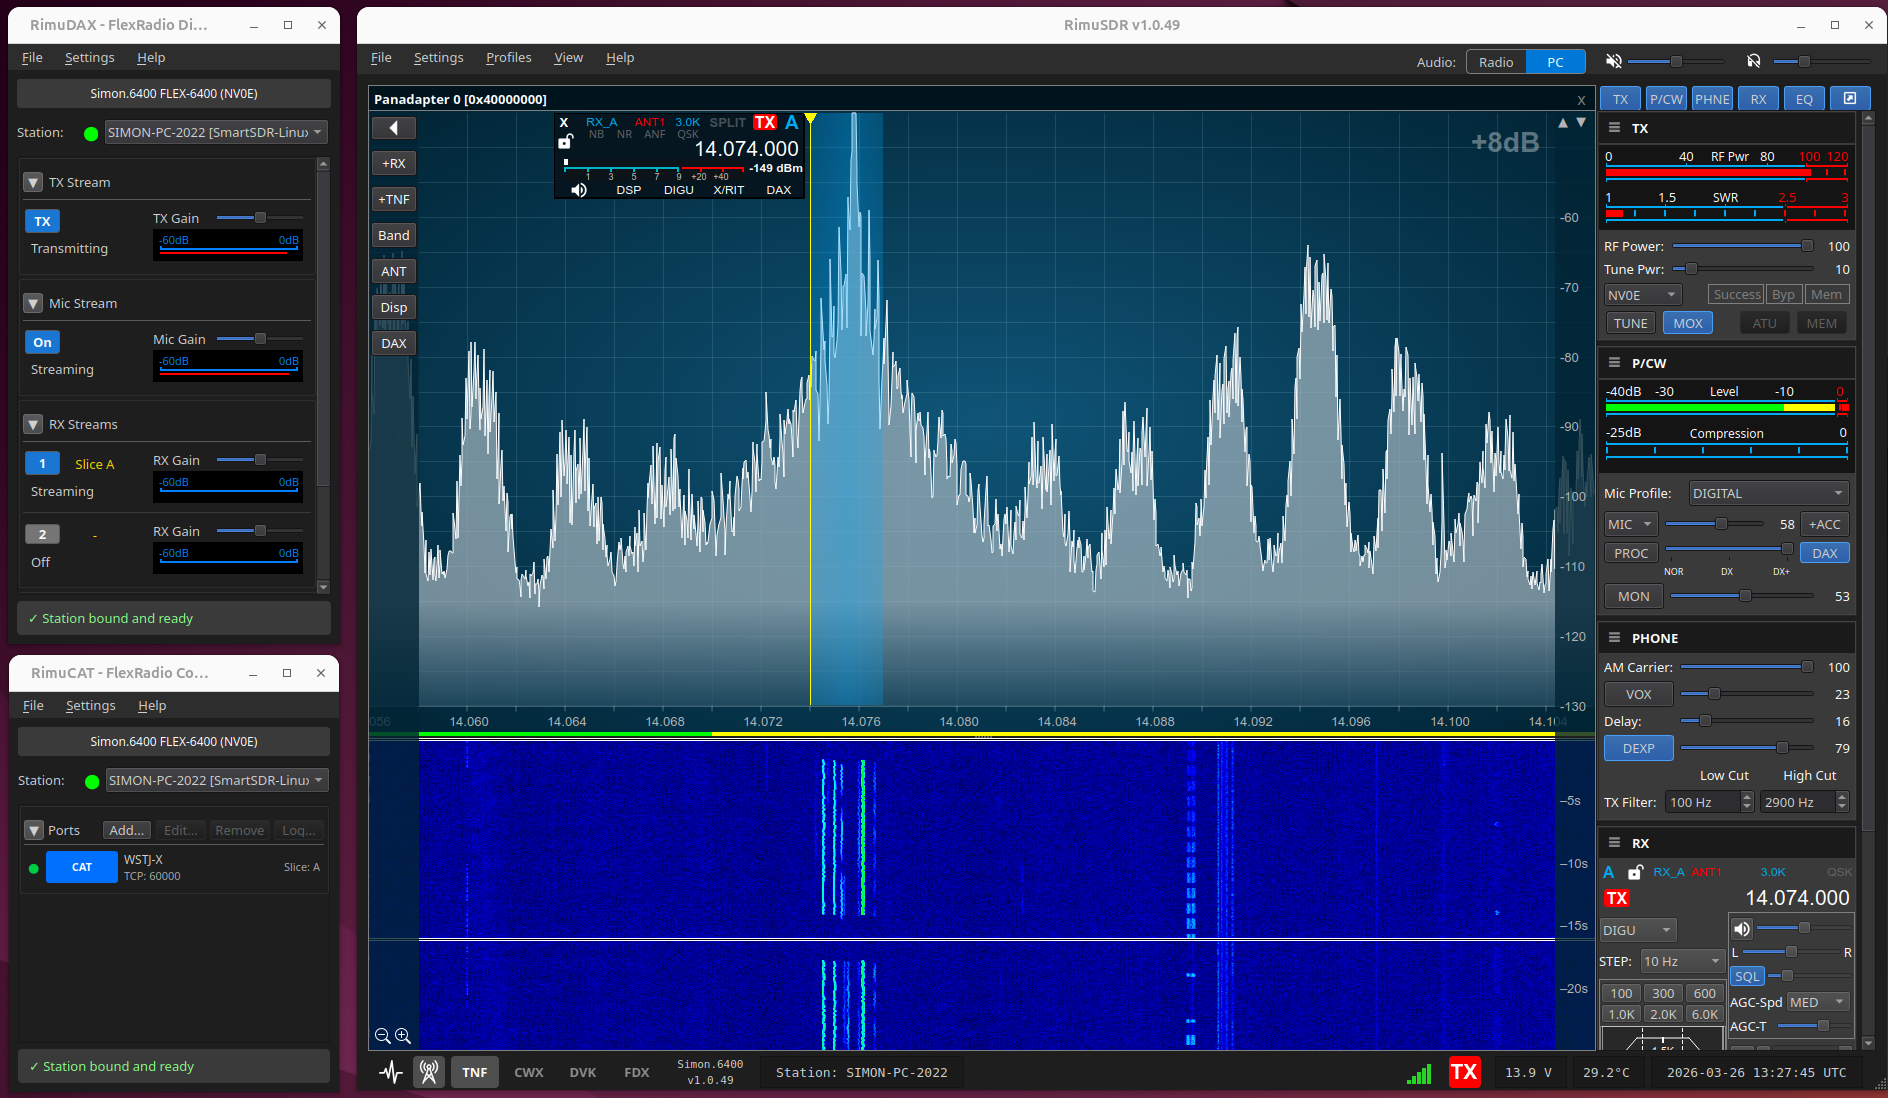
Three components of the RimuSDR suite work together to give WSJT-X everything it needs: RimuSDR provides the radio connection and DAX channel, RimuDAX routes audio, and RimuCAT exposes a TCP CAT port.

RimuSDR

RimuSDR

Start here. Connect to the radio and enable the DAX channel on the slice you want to use.

  • Connect to the FlexRadio
  • Set the Slice DAX channel to 1
  • Press the DAX button on that slice
RimuDAX

RimuDAX

Provides the audio path. Enable TX, Mic, and RX1 channels so WSJT-X can receive and transmit.

  • Connect and select the same station as RimuSDR
  • Enable TX, Mic, and RX1 channels
  • Confirm the RX1 meter responds to received signals
RimuCAT

RimuCAT

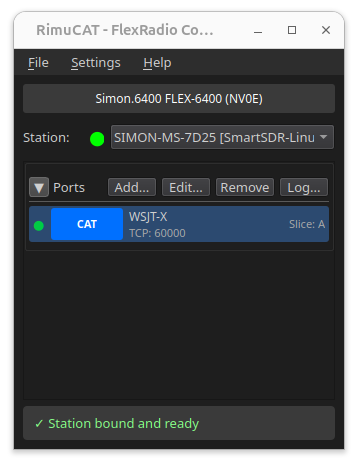
Provides the CAT control path via a TCP port that WSJT-X connects to as a FlexRadio 6xxx rig.

  • Connect and select the same station as RimuSDR
  • Create a CAT TCP connection on port 60000
  • WSJT-X connects to localhost:60000

Step 1 — RimuSDR: Connect and Enable DAX

RimuSDR must be connected to the radio and the DAX channel must be active on the slice before RimuDAX is started.

1. Start RimuSDR and connect
Open RimuSDR and connect to the FlexRadio. The radio will appear in the station list and the main SDR view will open once connected.
2. Set the Slice DAX channel to 1
On the slice you want WSJT-X to use, set the DAX channel selector to 1. This assigns audio channel 1 to that slice.
3. Press the DAX button
Press the DAX button on the slice to activate the audio channel. RimuDAX will pick up channel 1 when it connects.

Step 2 — RimuDAX: Enable Audio Channels

RimuDAX routes audio between the radio and the Linux audio system. Enable the TX, Mic, and RX1 channels so WSJT-X has both a receive input and a transmit output.
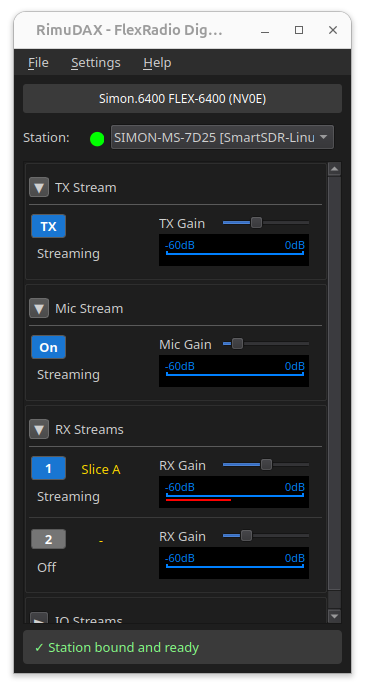
4. Start RimuDAX and connect
Open RimuDAX and connect to the radio. Select the same station that RimuSDR is connected to — in most setups there will only be one station in the list.
5. Enable TX, Mic, and RX1
Enable the TX, Mic, and RX1 channels. These provide transmit audio out to the radio, microphone input, and the DAX channel 1 receive audio that WSJT-X will decode.
6. Confirm RX1 is receiving
Check that the RX1 channel level meter moves in response to signals from the radio. If it is not responding, confirm the DAX button is active on the slice in RimuSDR.

Step 3 — RimuCAT: Create a TCP CAT Connection

RimuCAT exposes the radio's frequency, mode, and PTT to WSJT-X over a TCP network port. No physical serial cable is required.

7. Start RimuCAT and connect
Open RimuCAT and connect to the radio. As with RimuDAX, select the same station that RimuSDR is connected to.
8. Create a CAT TCP connection
Add a new CAT connection and set the type to TCP. Set the port to 60000. RimuCAT will begin listening on that port for incoming connections from WSJT-X.
Ready for WSJT-X
With the TCP listener active, WSJT-X can connect to localhost:60000 to read frequency and mode, and to key PTT when transmitting.

Step 4 — WSJT-X Radio Settings

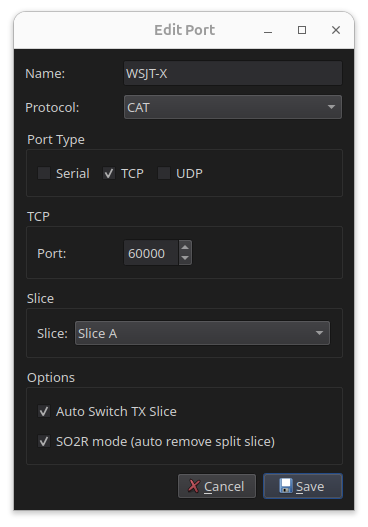
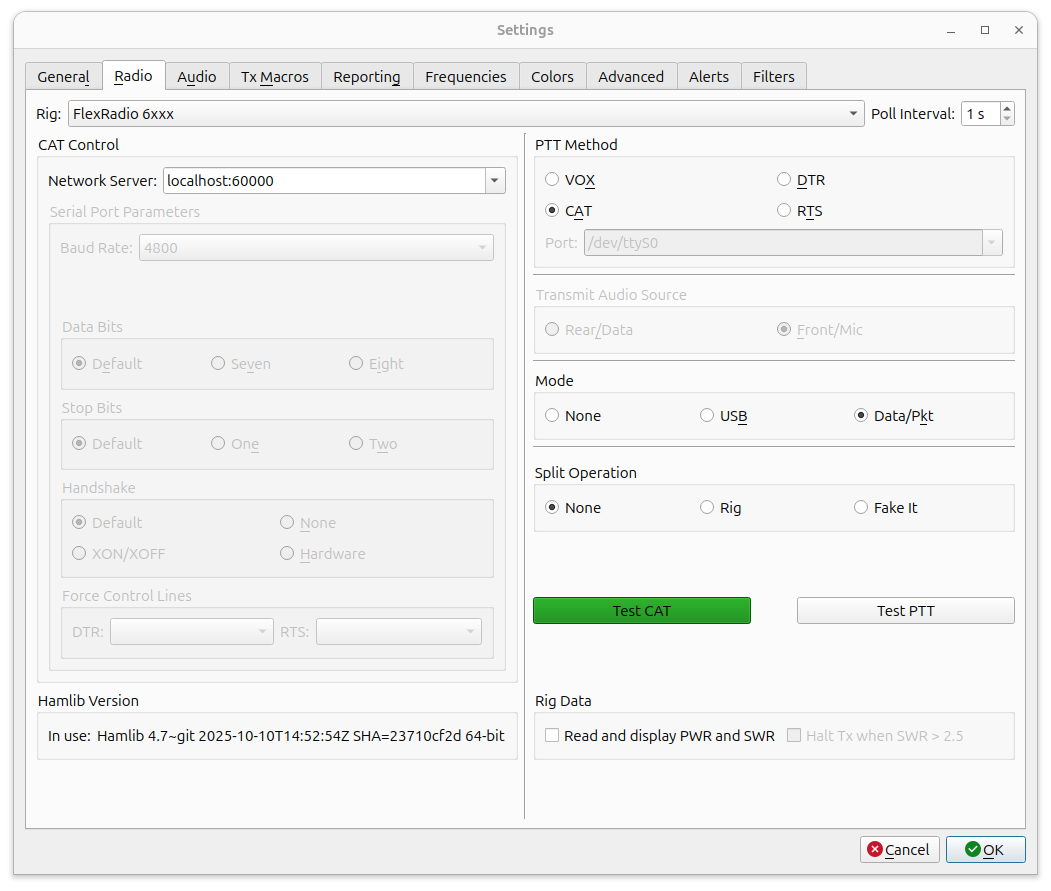
Open WSJT-X and configure the Radio tab to connect to RimuCAT over the TCP port. Use the FlexRadio 6xxx rig type so WSJT-X uses the correct command set.

9. Rig: FlexRadio 6xxx
In WSJT-X go to File › Settings › Radio. Set Rig to FlexRadio 6xxx. This tells WSJT-X which command protocol to use when talking to RimuCAT.
10. Network server: localhost:60000
In the Network Server field enter localhost:60000 — the address and port that RimuCAT is listening on.
11–13. PTT, Mode, and Split
Set PTT Method to CAT, Mode to Data/Pkt, and Split Operation to None. Then click Test CAT — the button should turn green to confirm the connection is working.

Step 5 — WSJT-X Audio Settings

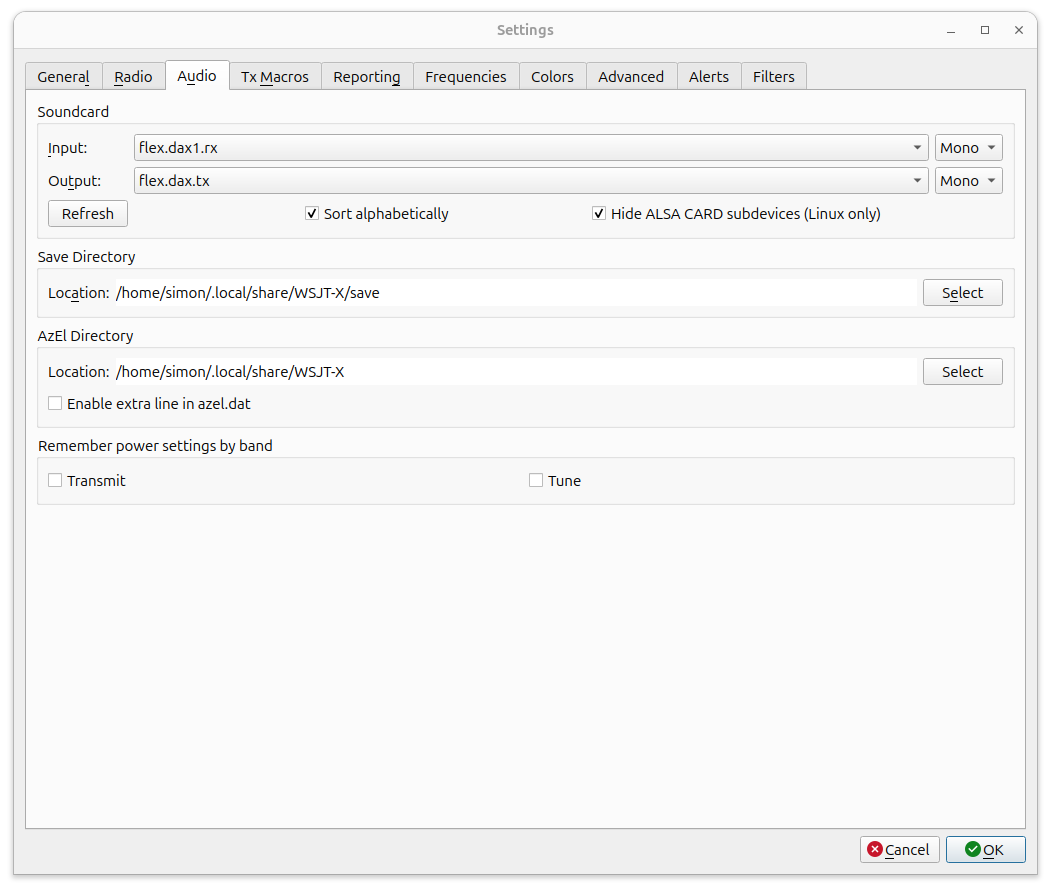
With the Radio tab configured, move to the Audio tab and select the RimuDAX devices as the soundcard input and output.

15. Open the Audio tab
In WSJT-X Settings, click the Audio tab. The Soundcard section has separate Input and Output drop-down selectors.
16. Input: flex.dax1.rx1
Set the Input field to flex.dax1.rx1. This is the RimuDAX DAX channel 1 receive stream — the audio coming from the radio that WSJT-X will decode.
17. Output: flex.dax.tx
Set the Output field to flex.dax.tx. This routes WSJT-X transmit audio back through RimuDAX to the radio when the software keys PTT.
Setup checklist
  • RimuSDR connectedRimuSDR must be connected to the radio and the DAX button active on the slice before starting RimuDAX.
  • DAX channel set to 1The slice DAX channel selector in RimuSDR must be set to 1 so RimuDAX picks up the correct audio stream.
  • TX, Mic, RX1 enabledAll three channels must be enabled in RimuDAX. Confirm the RX1 meter is responding to received signals before moving on.
  • RimuCAT TCP on port 60000RimuCAT must have a TCP listener active on port 60000 before WSJT-X attempts to connect.
  • Test CAT greenThe Test CAT button in WSJT-X Radio settings must turn green. A failure usually means RimuCAT is not running or the wrong port is entered.
  • Audio input: flex.dax1.rx1The WSJT-X Audio Input must be set to flex.dax1.rx1 to receive audio from the radio via RimuDAX channel 1.
  • Audio output: flex.dax.txThe WSJT-X Audio Output must be set to flex.dax.tx to route transmit audio back to the radio through RimuDAX.
  • Same station throughoutRimuDAX and RimuCAT must both be connected to the same station (radio) as RimuSDR.
×