RimuCAT bridges the FlexRadio network protocol to the interfaces your software already speaks - CAT, Hamlib rigctld, PTT, Winkeyer, OTRSP, N1MM+ spots, USB passthrough, and the Wavelog and Cloudlog logbooks - so logging programs, digital-mode software, and automation tools can control your radio from Linux.
RimuCAT is the radio control component of the RimuSDR suite. It translates the FlexRadio network protocol into the interfaces external software expects, and presents each one as a port that programs reach over TCP, UDP, a virtual serial port, or a real serial device.
TCP Connections
The recommended connection method for modern software such as WSJT-X and N1MM+.
Create a TCP listener on any port you choose
Configure external software as FlexRadio 6xxx rig type
Point it to localhost and the port you selected
Multiple TCP connections supported simultaneously
Virtual Serial Ports
For software that only supports serial port CAT, such as Fldigi and older logging programs.
Creates a virtual port that appears under /dev/
Behaves like a real serial device
Works with any software that supports serial CAT control
Multiple virtual ports can be created simultaneously
One Protocol, Four Transports
Every port pairs a protocol with the way your software reaches it.
Virtual Serial - a port RimuCAT creates, such as /tmp/ttyCAT0
Hardware Serial - an existing device such as /dev/ttyUSB0
TCP - a listener on a port you choose
UDP - a datagram socket, used for N1MM+ spots
Not every protocol offers every transport
Port Types
A port is one endpoint RimuCAT exposes to other software. Each port has a protocol - the language it speaks - and a transport - how software reaches it. Create as many ports as you need; they all run at the same time, and each one is configured from the same Add Port dialog.
Kenwood-dialect CAT control for logging and digital-mode software - frequency, mode, PTT, S-meter, and filters. Virtual serial, hardware serial, TCP, or UDP. Bound to one slice.
The Hamlib rigctld network dialect, for software configured as Hamlib NET rigctl rather than a Kenwood rig. TCP or virtual serial. One slice, or two in dual VFO mode.
CW keying from contest loggers that drive a WinKey keyer, such as N1MM+ and Win-Test. Virtual serial or TCP. No slice to select - keying goes to the radio's CW engine.
SO2R antenna and audio switching between two slices, for contest loggers that speak the Open Two Radio Switching Protocol. Virtual serial or TCP. Bound to two slices.
Relays raw bytes between a serial port on your computer and a FlexRadio USB cable, so software on the PC reaches hardware attached to the radio. Virtual serial or hardware serial.
Pushes live frequency, mode, and power straight into your Wavelog or Cloudlog logbook over its HTTP API, and accepts click-to-tune back. No serial or TCP transport, and no gateway process.
Connecting RimuCAT to Your Radio
RimuCAT must be connected to the same FlexRadio station as RimuSDR before any port will work. Follow these steps to get RimuCAT running.
Start RimuSDR first
RimuSDR must be connected to the radio before RimuCAT is started. RimuCAT relies on the same station connection that RimuSDR establishes.
Open RimuCAT
Launch RimuCAT from your applications menu or from the RimuSDR interface. RimuCAT will appear in its own window alongside RimuSDR.
Connect to the station
In RimuCAT, select the same station that RimuSDR is connected to and click Connect. RimuCAT will show a connected status once it has established its own link to the radio.
Idle until a port is created
After connecting RimuCAT to the station, it will sit idle until you create at least one port. This is expected behavior - RimuCAT exposes no endpoint of any kind until you configure one.
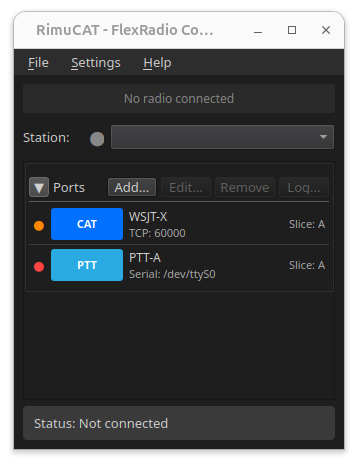
RimuCAT after connecting to a station and creating a TCP CAT connection. The connection list shows the type, port, and status of each configured endpoint.
CAT Port
The CAT port provides bidirectional radio control — frequency, mode, and PTT — to external software. Multiple simultaneous CAT connections are supported; use a different port number for each application and they can all control the radio at the same time.
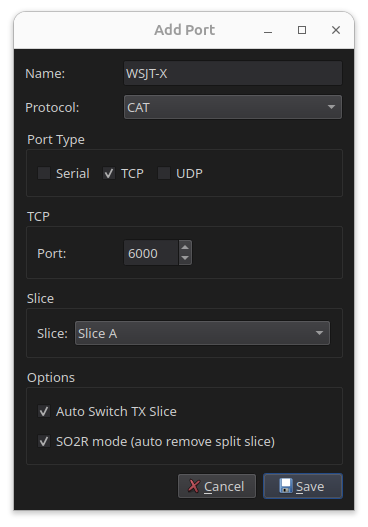
1Give the port a name (e.g. WSJT-X)
2Select Protocol CAT
3Select the Port Type of TCP
4Enter an unused port above 1024
5Select the Slice to associate with the port
6Click Save to create the port
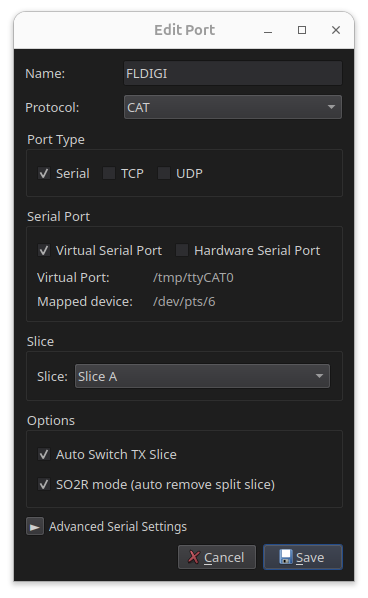
1Give the port a name (e.g. Fldigi)
2Select Protocol CAT
3Select the Port Type of Virtual Serial
4Select the Slice to associate with the port
5Click Save to create the port
6Note the device path shown in RimuCAT (e.g. /tmp/ttyCAT0) and enter it in your application
The virtual port exists only while RimuCAT is running and connected. If RimuCAT is closed or disconnected, the port disappears and applications holding it open will need to reconnect.
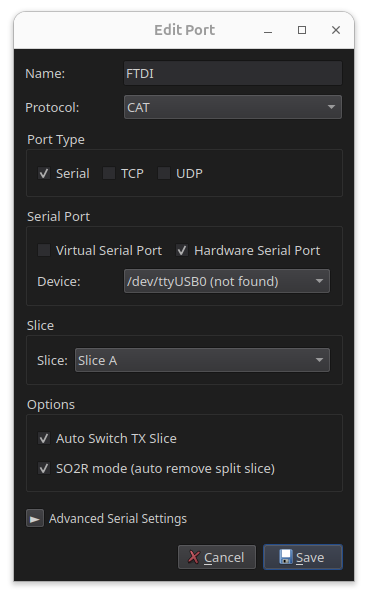
1Give the port a name (e.g. Logger)
2Select Protocol CAT
3Select the Port Type of Hardware Serial
4Choose the physical port device from the list (e.g. /dev/ttyUSB0)
5Set the baud rate to match your connected hardware or software
6Select the Slice to associate with the port
7Click Save to create the port
On Linux, access to serial port devices requires membership in the dialout group. If the port does not appear or RimuCAT cannot open it, add your user account to the group with sudo usermod -aG dialout $USER and then log out and back in for the change to take effect.
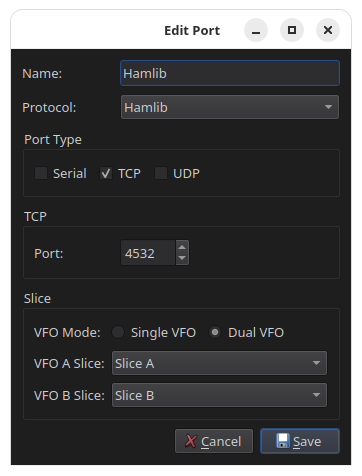
Hamlib Port
The Hamlib port speaks the rigctld network dialect. Use it for software that is configured as Hamlib NET rigctl instead of a Kenwood rig, such as WSJT-X, Fldigi, Not1MM, and GridTracker. More than one program can connect to the same Hamlib port at the same time.
1Give the port a name (e.g. Hamlib)
2Select Protocol Hamlib
3Select the Port Type of TCP
4Leave the port at 4532, the standard rigctld port, unless it is already in use
5Select the VFO Mode - Single VFO for one slice, or Dual VFO for split and for loggers that work two VFOs
6Select the Slice for each VFO
7Click Save to create the port
In your software, set the rig type to Hamlib NET rigctl and the network server to 127.0.0.1:4532. In Single VFO mode the client sees VFO A only, and split is not available; Dual VFO binds a second slice as VFO B, and the client must also be set up for two VFOs or it will use VFO A alone.
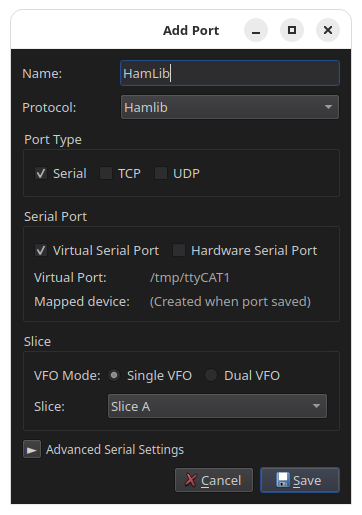
1Give the port a name (e.g. HamLib)
2Select Protocol Hamlib
3Select the Port Type of Virtual Serial
4Select the VFO Mode and the Slice for each VFO
5Click Save to create the port
6Note the device path shown in RimuCAT (e.g. /tmp/ttyCAT1) and enter it in your application
TCP is the usual choice here, because rigctl clients connect over the network. Select Virtual Serial only if your software expects the rigctl dialect on a serial device.
PTT Port
The PTT port provides a dedicated transmit keying interface separate from CAT control. Use a PTT port when your application needs to key the radio for transmit independently of CAT commands. PTT ports are serial only - there is no TCP or UDP option.
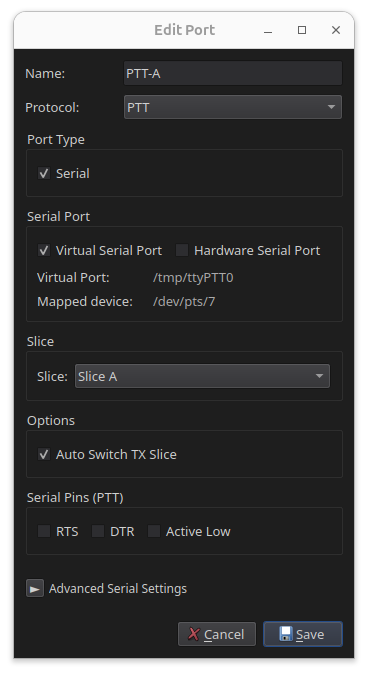
1Give the port a name (e.g. PTT-VSP)
2Select Protocol PTT
3Select the Port Type of Virtual Serial
4Select RTS or DTR to match what your application uses for PTT keying
5Check Active Low only if your application keys the radio by dropping the line rather than raising it
6Select the Slice to associate with the port
7Click Save to create the port
8Note the device path shown in RimuCAT and enter it in your application's PTT port setting
With Auto Switch TX Slice enabled, the port makes its slice the transmit slice before keying. Clear it if the port should key the radio without changing which slice transmits - the slice selector then disappears, because the port no longer needs one.
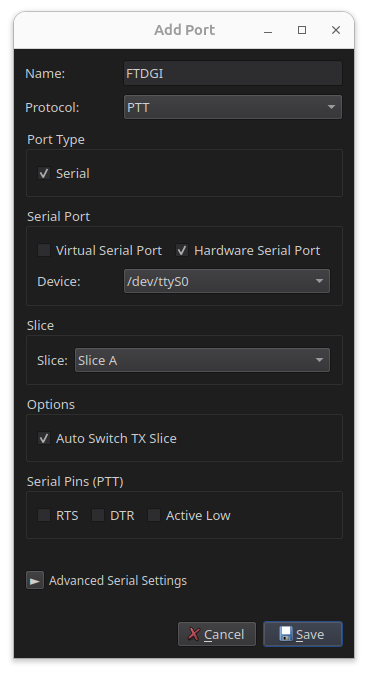
1Give the port a name (e.g. PTT-Serial)
2Select Protocol PTT
3Select the Port Type of Hardware Serial
4Choose the physical port device from the list (e.g. /dev/ttyUSB0)
5Select RTS or DTR to match what your hardware uses for PTT keying
6Check Active Low only if your hardware keys the radio by dropping the line rather than raising it
7Select the Slice to associate with the port
8Click Save to create the port
On Linux, access to serial port devices requires membership in the dialout group. If RimuCAT cannot open the port, add your user account to the group with sudo usermod -aG dialout $USER and then log out and back in for the change to take effect.
Winkeyer Port
The Winkeyer port emulates a WinKey CW keyer and sends the keying to the radio's own CW engine. Use it with contest loggers that drive a WinKey, such as N1MM+, Win-Test, and TR4W. There is no slice to select - CW keying is a radio-wide function.
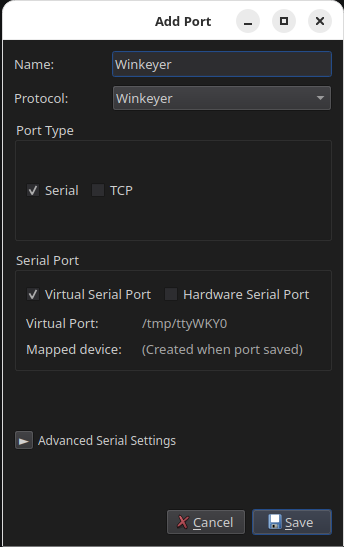
1Give the port a name (e.g. Winkeyer)
2Select Protocol Winkeyer
3Select the Port Type of Virtual Serial
4Click Save to create the port
5Note the device path shown in RimuCAT (e.g. /tmp/ttyWKY0) and enter it as the keyer port in your logging software
6Set the keyer type in your software to WinKey and let it open the port
Leave the Advanced Serial Settings alone. RimuCAT sets the WinKey line rate of 1200 baud with two stop bits by itself, whatever the advanced fields show. RimuCAT identifies itself as a first-generation WinKey, so select the WK1 keyer type if your software asks which generation to use.
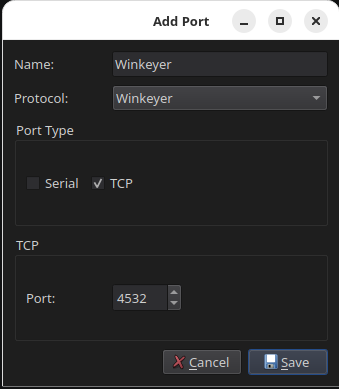
1Give the port a name (e.g. Winkeyer)
2Select Protocol Winkeyer
3Select the Port Type of TCP
4Enter an unused port above 1024
5Click Save to create the port
Use TCP for software that can reach a WinKey over the network. Loggers that expect a keyer on a COM port need the Virtual Serial option instead.
OTRSP Port
The OTRSP port implements the Open Two Radio Switching Protocol for SO2R contest operation. It switches receive audio and the transmit slice between two slices on the one radio, so a logger treats your FlexRadio as two stations. An OTRSP port binds two slices rather than one.
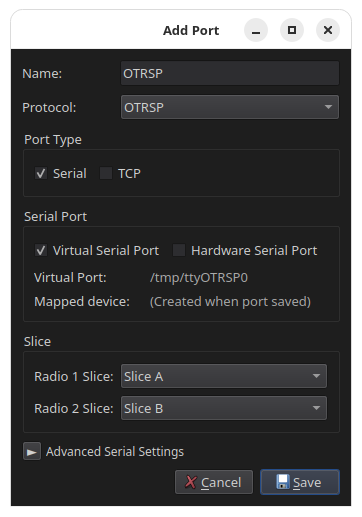
1Give the port a name (e.g. OTRSP)
2Select Protocol OTRSP
3Select the Port Type of Virtual Serial
4Select the Radio 1 Slice and the Radio 2 Slice
5Click Save to create the port
6Note the device path shown in RimuCAT (e.g. /tmp/ttyOTRSP0) and enter it as the SO2R device in your logger
The two slices must both exist on the radio before the port can switch between them. Create them in RimuSDR first.
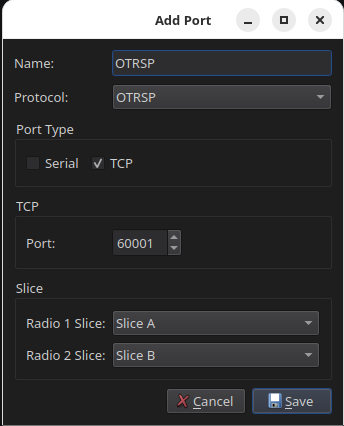
1Give the port a name (e.g. OTRSP)
2Select Protocol OTRSP
3Select the Port Type of TCP
4Leave the port at 60001, the OTRSP default, unless it is already in use
5Select the Radio 1 Slice and the Radio 2 Slice
6Click Save to create the port
RX commands set which slice you hear and where it sits in the stereo image; TX commands set which slice transmits. The port mirrors the resulting audio state to the transmit monitor and CW sidetone.
N1MM+ Spot Port
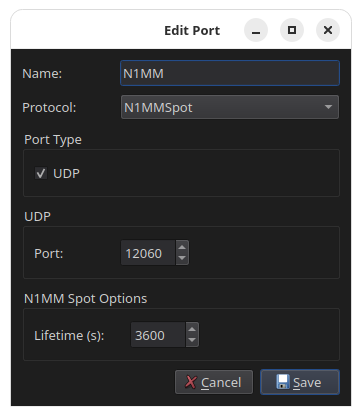
The N1MM+ Spot port receives bandmap spots broadcast by N1MM+ Logger and places them on the panadapter in RimuSDR, colored by their status. It carries spots in one direction only and needs no slice. UDP is its only transport.
1Give the port a name (e.g. N1MM)
2Select Protocol N1MMSpot
3The Port Type is set to UDP automatically
4Enter the UDP port that N1MM+ sends spots to (N1MM+ uses 12060 by default)
5Set the Lifetime in seconds, which is how long a spot stays on the panadapter before it expires
6Click Save to create the port
7In N1MM+, enable the broadcast of spot data to this computer and port
The UDP port in RimuCAT must match the port N1MM+ broadcasts to, and N1MM+ must be sending to the address of the computer RimuCAT runs on. Spots that N1MM+ deletes are removed from the panadapter as well.
USB Passthrough Port
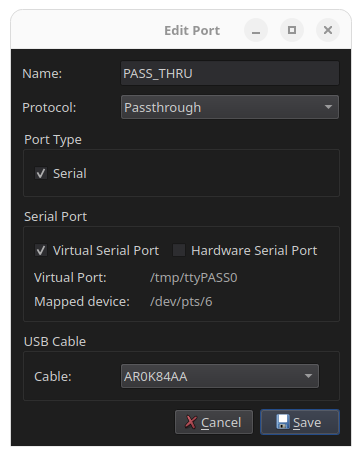
A passthrough port relays raw bytes in both directions between a serial port on your computer and a FlexRadio USB cable, so software on the PC can reach hardware plugged into the radio. Set the cable up as a passthrough cable on the radio first, then select it here by serial number. There is no slice and no protocol translation - the bytes pass through untouched.
1Give the port a name (e.g. PASS_THRU)
2Select Protocol Passthrough
3Select the Port Type of Virtual Serial
4Select the Cable by its serial number
5Click Save to create the port
6Note the device path shown in RimuCAT (e.g. /tmp/ttyPASS0) and enter it in the software that talks to the attached hardware
If the cable list is empty, the radio has no USB cable configured for passthrough. Configure the cable on the radio, then reopen the dialog.
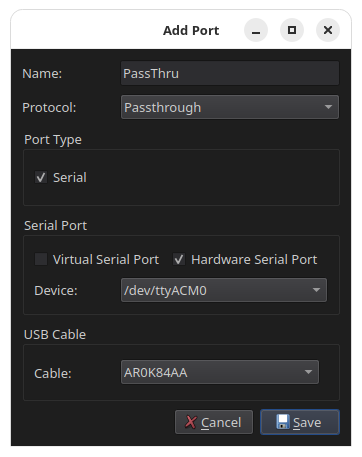
1Give the port a name (e.g. PassThru)
2Select Protocol Passthrough
3Select the Port Type of Hardware Serial Port
4Choose the physical port device from the list (e.g. /dev/ttyACM0)
5Select the Cable by its serial number
6Click Save to create the port
On Linux, access to serial port devices requires membership in the dialout group. If the port does not appear or RimuCAT cannot open it, add your user account to the group with sudo usermod -aG dialout $USER and then log out and back in for the change to take effect.
Wavelog / Cloudlog Port
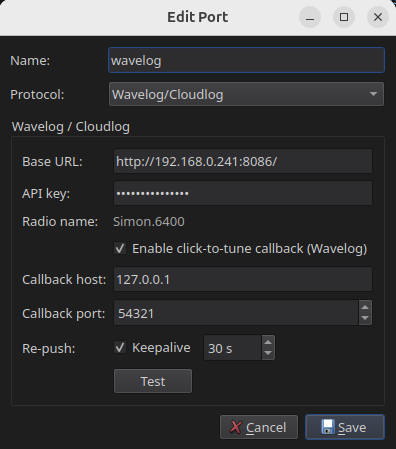
The Wavelog/Cloudlog port is the one port with no serial, TCP, or UDP transport to configure. It talks to your logbook's HTTP API directly, pushing live frequency, mode, and power as you operate, and answering click-to-tune requests from the log. There is no WaveLogGate or CloudlogCAT process to install.
1Give the port a name (e.g. wavelog)
2Select Protocol Wavelog/Cloudlog
3Enter the Base URL and API key of your logbook
4Enable click-to-tune and set a callback host and port your logbook can reach, if you want to tune the radio from the log
5Click Test to confirm RimuCAT reaches the logbook, then click Save
There is no slice to select. The radio name is taken from the FlexRadio nickname, and the port follows whichever slice is active, so the logbook always shows the slice you are working. The Wavelog / Cloudlog Setup Guide covers the logbook side, including where to find the API key.
Related Guides
Step-by-step integration guides for connecting digital-mode and logging applications to RimuSDR.