MIDI controllers
RimuSDR maps the controls of a USB MIDI controller to radio functions, so you can tune, change mode, and key CW from hardware instead of the mouse.
Templates are supplied for the controllers below. Loading one gives you a working mapping in a few clicks, with no learning required.
-
A USB adapter for Morse paddles, a straight key, or a PTT switch.
-
Tuning knob, six buttons, and a paddle jack.
-
Touch-dial controllers: CTR2-Uno, CTR2-Duo, CTR2-Quad, and the older CTR2-Dial and CTR2-Flex.
-
Touch screen with five physical knobs, four pushbuttons, and two jacks.
Tested hardware
RimuSDR MIDI support has been tested with these controllers:
- CTR2-MIDI
- From Lynovation. A purpose-built MIDI controller designed for amateur radio operators.
- HaliKey
- From Halibut Electronics. A USB adapter for Morse paddles, a straight key, or a PTT switch.
The MIDI Controller Mapping dialog
Check which dialog you have
This documentation describes the dialog with a Mapping menu. If your dialog shows a Profile drop-down instead, update RimuSDR before you follow these pages.
Go to Settings | MIDI Controller....
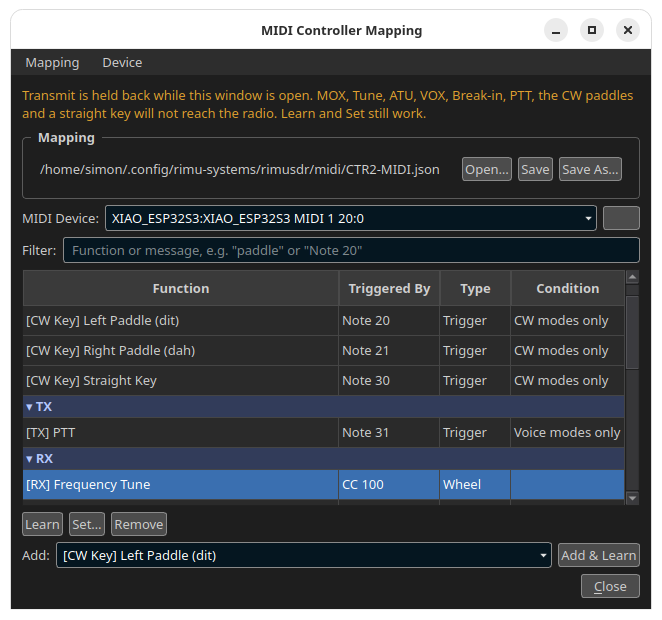
The dialog shows one controller's mapping as one table. Each row connects one control on the controller to one RimuSDR function. You do not need a radio connection to set up a mapping.
Transmit is held back while the dialog is open
While the dialog is open, MOX, Tune, ATU, VOX, Breakin, PTT, the CW paddles and a straight key do not reach the radio. A press on one of those controls is discarded, not saved for later, so nothing transmits when you close the dialog. Learn and Set... still work.
Close the dialog before you test keying or PTT.
From top to bottom, the dialog has:
- Mapping menu
- Open..., New from template (HaliKey, CTR2-MIDI, CTR2-Dial and CTR2-Max), Save and Save As....
- Device menu
- MIDI Monitor... shows the messages your controller sends. Write bindings to log writes the current bindings to the RimuSDR log.
- Mapping
- The path of the mapping file in use, with Open..., Save and Save As... buttons. A template that has no file yet shows (not saved to a file yet), and Save is unavailable until you use Save As.... The words unsaved changes appear after the path when there are changes to save.
- MIDI Device
- The connected MIDI controllers. Selecting a controller loads the mapping file that belongs to it, or an empty mapping if it has none yet. If your controller is missing, click the refresh button beside the list.
- Filter
- Shows only the rows whose function or message contains your text, for
example
paddleorNote 20. - The table
- The bindings, grouped under headings such as CW Key, TX and RX. Click a heading to fold or unfold its rows. See The table.
- Learn, Set..., Remove
- Operate on the selected row.
- Add
- Choose a function, then click Add & Learn to bind a control to it.
The table
- Function
- The RimuSDR function. The part in brackets is its group, for example [RX] Frequency Tune.
- Triggered By
- The MIDI message that operates the function, such as
Note 20for a button or contact, orCC 100for a knob. A row reads not bound when no control is assigned, and Waiting... while it learns. - Type
- How the function uses the control. See Types.
- Condition
- The modes the row acts in. Empty means all modes. See Conditions.
There is one row for each binding. A function operated from two controls has two rows.
The CW Key group always shows its three rows - Left Paddle (dit), Right Paddle (dah) and Straight Key - even when they are not bound, so they are easy to find when you set up a key.
Types
| Type | What the control does |
|---|---|
| Press | Acts once each time the button is pressed. |
| Trigger | Acts for as long as the contact is held, and stops on release. Used for the CW paddles, the straight key, [TX] PTT and [TX] Tune (trigger). |
| Slider | Sends its position, from 0 to 127. The setting follows the position of the knob or fader. |
| Wheel | Sends one click at a time. Each click moves the setting up or down a step from where it is. |
Some rows, such as [RX] AF Gain and [Pan] Zoom, can work with either a slider or a wheel. On those rows the Type column is a drop-down. Set it to match how the control is set up on the controller. If the two disagree, the control seems not to work. For example, a knob set up as a wheel, on a row set to Slider, only flips the setting between two nearby values.
Working with bindings
- To add a function
- Select it in the Add list and click Add & Learn. The new row reads Waiting.... Operate the control on the controller.
- To change a binding
- Select the row, click Learn, then operate the control. The new message replaces the old one. While the row is learning, the Learn button reads Cancel. Click it to stop without a change.
- To enter a binding by hand
- Select the row and click Set.... In the Set MIDI Binding window, choose Note for a button or CC for a knob, enter the number (0 to 127), and click OK. This helps when a device sends several messages for one press, so Learn cannot capture the right one. A Trigger row accepts a note only.
- To delete a binding
- Select the row and click Remove.
- To find the row for a control
- Operate the control. The dialog selects the matching row.
Conditions
Each row acts only in the modes its Condition column shows. The CW Key rows act in CW modes only, and [TX] PTT acts in Voice modes only.
This is how one physical control can serve two purposes: on a HaliKey, the same contact keys CW in CW modes and keys PTT in voice modes.
Things to know
- A front-panel button cannot drive a Trigger function. It reports its press only after you release it, so it cannot hold. Learn refuses it and says so in the row.
- One note can drive only one Trigger function, so a single press can never key CW and PTT together. Remove the old row before you give that note to a different Trigger function.
- A note that drives a Trigger function cannot also drive another function. Learn refuses it and asks you to press another control.
- RimuSDR does not send MIDI back to the controller. If you change a value on screen, the next movement of a Slider control sets the value to the knob's position. A Wheel control carries on from the value on screen.
- The dialog asks you to save unsaved changes before it closes, opens another mapping or template, or changes to another MIDI device.
Saving a mapping
A template is not saved to a file until you save it:
- Click Save As....
- Keep the suggested folder and file name.
- Click Save.
When you save with Save As..., or open a mapping file with Open..., RimuSDR remembers that the file belongs to the selected MIDI device. It then loads that mapping automatically the next time you connect the controller.
After that, Save writes your changes to the same file.
Mapping files from an earlier RimuSDR
RimuSDR can open a mapping file from an earlier version. If the file holds several mappings, RimuSDR asks which one to open. It also reports any rows it updated or could not use. Save is unavailable for such a file: use Save As... to keep the result in the current format.