Wavelog and Cloudlog
RimuCAT talks directly to Wavelog and Cloudlog over their HTTP API. Live frequency, mode, and power updates flow into your logbook, and click-to-tune from the log returns to the radio.
There is no WaveLogGate or CloudlogCAT helper process to install or run.
Before you start
RimuSDR must be connected to the radio. RimuCAT reads the radio's current frequency, mode, and power from that connection and reports it to your logbook, so leave RimuSDR connected while you log.
You also need:
- A Wavelog or Cloudlog instance you can sign in to.
- An API key with read/write permission. Read/write is required for both live updates and click-to-tune.
- The base URL of your instance.
There is no slice to select for this port. The radio is identified by its radio name, which RimuCAT fills in automatically.
Step 1 - Create an API key
-
Sign in to your Wavelog or Cloudlog instance.
-
Open Account › API Keys.
-
Generate a new API key with read/write permission.
-
Copy the key. You paste it into RimuCAT in the next step.
-
Record the base URL of your instance, including the port if it uses one:
Step 2 - Create the port in RimuCAT
-
Open RimuCAT and connect to the radio. Select the same station that RimuSDR is connected to. In most setups there is only one station in the list.
-
Add a new port.
-
Set Protocol to Wavelog/Cloudlog.
-
Complete the fields:
Field Value Name A name for the port, for example wavelog.Base URL The base URL from Step 1. API key The read/write key from Step 1. Radio name Filled in automatically, for example Simon.6400. This is how your radio state is grouped in the logbook.Enable click-to-tune callback Optional. Select this to QSY the radio from the log. Callback host The address Wavelog can reach, for example 127.0.0.1.Callback port The port Wavelog connects to, for example 54321.Re-push · Keepalive Optional. Re-sends the current radio state at an interval, 30 sby default. -
Click Test. RimuCAT confirms that it can reach your logbook.
-
Click Save.
RimuCAT begins sending live frequency, mode, and power to your logbook.
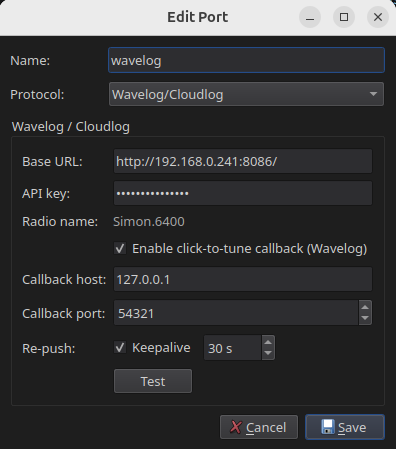
Keepalive keeps the logbook in sync
Enable Re-push · Keepalive to periodically re-send the current radio state. Your logbook stays in sync even when the radio has not changed.
Step 3 - Verify the integration
Check that live updates arrive. Tune the radio in RimuSDR. The frequency, band, and mode fields of your Wavelog or Cloudlog QSO entry follow the radio.
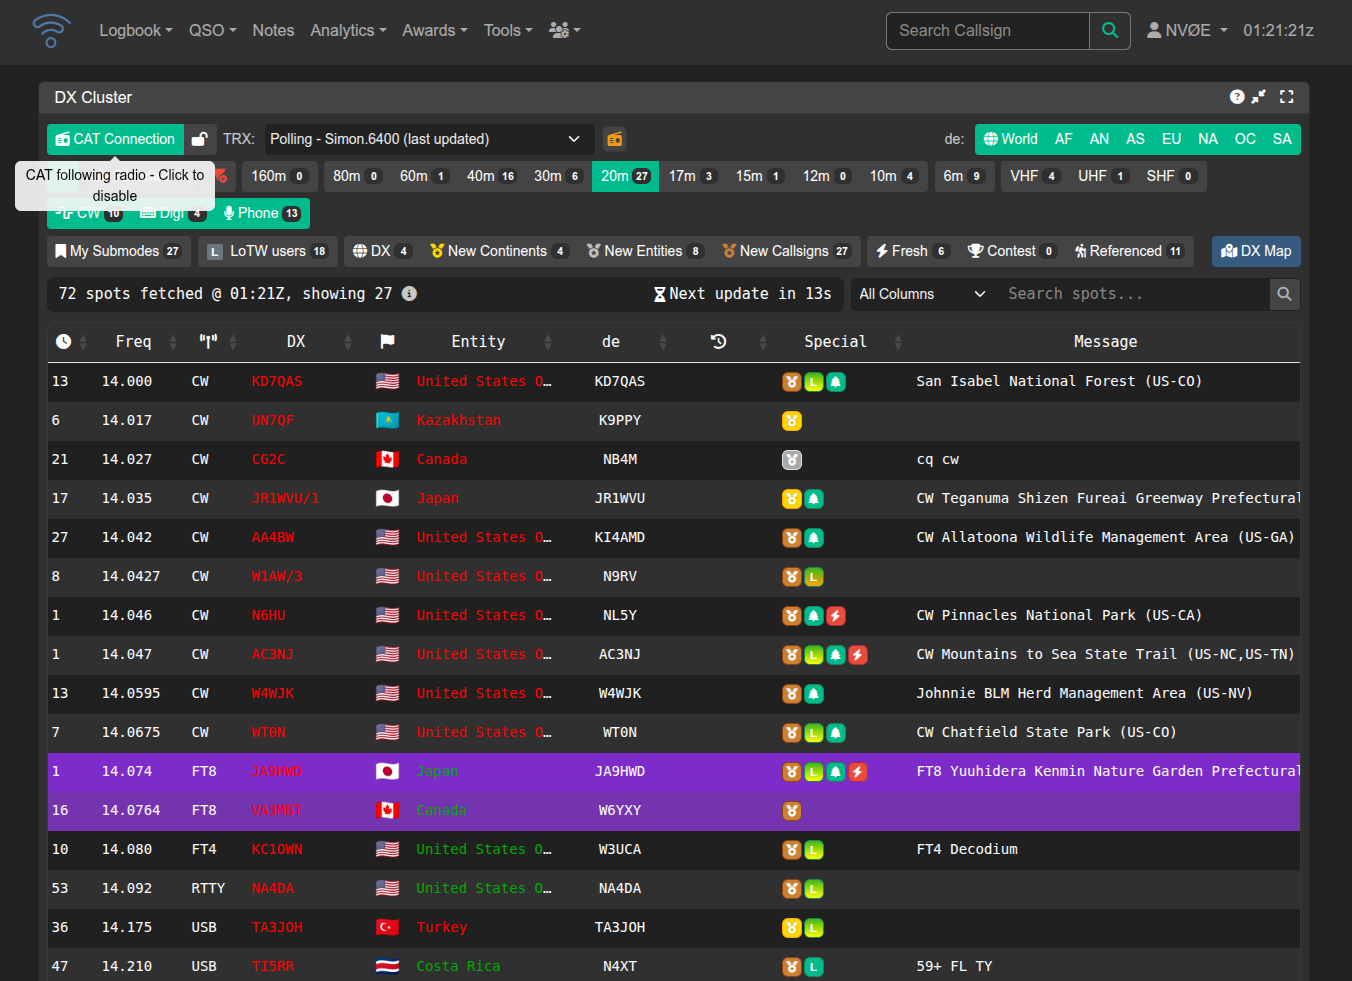
Check that click-to-tune returns. On Wavelog's DX Cluster page, click
CAT Connection to connect to RimuSDR. The TRX selector shows your radio, for
example Simon.6400. Hold Ctrl and click a spot's frequency. RimuSDR tunes
to that frequency.
Troubleshooting
If updates do not reach your logbook, check each of these in order.
- RimuSDR connected
- RimuSDR must be connected to the radio so RimuCAT has live radio state to report.
- Same station throughout
- RimuCAT must be connected to the same station as RimuSDR.
- Base URL correct
- The Base URL in RimuCAT must match your logbook's address, including the port if it uses one.
- Read/write API key
- The key must have read/write permission. A read-only key blocks both live updates and click-to-tune.
- Click-to-tune callback
- For click-to-tune, enable the callback and set a Callback host and port that Wavelog can reach.
- Tested and saved
- Use Test to confirm the connection, then Save the port.
Still stuck? Contact support.