CTR2-MIDI
The Lynovation CTR2-MIDI has a tuning knob, six buttons, and a 3.5 mm jack for paddles or a straight key.
Step 1 - Prepare the controller
-
Connect the CTR2-MIDI to a USB port.
Use a USB data cable, not a power-only cable.
-
For CW keying, use the USB connection rather than Bluetooth. Bluetooth adds delay to each key press.
-
Confirm Knob Map 1 is active:
- Press and hold BTN3, then press the knob.
- Listen to the Morse reply.
M 1means Map 1 is active. - If you hear
M 2, press and hold BTN3 and press the knob again.
The RimuSDR template agrees with the factory settings of Map 1. If you changed control types on the controller, set them back: WheelA for the VFO (CC 100), and SliderA for the other knob functions.
Step 2 - Load the template
-
Start RimuSDR.
-
Select Settings | MIDI Controller....
-
Confirm the MIDI Device list has the CTR2-MIDI selected.
- If it is your only controller, RimuSDR selects it automatically.
- If it is not selected, select the device with
XIAO_ESP32S3in its name. This is the name the CTR2-MIDI reports over USB. - If the list is empty, click the refresh button beside the list.
-
Select Mapping | New from template | CTR2-MIDI.
-
A message reports that the template loaded with 13 bindings. Click OK.
Home mode is the knob mode with both yellow LEDs off.
| Control | Message | RimuSDR function |
|---|---|---|
| Knob, turn (Home mode) | CC 100 | [RX] Frequency Tune |
| Knob, push and turn (Home mode) | CC 101 | [RX] AF Gain |
| BTN1, short press | Note 1 | [RX] Mode Cycle |
| BTN2, short press | Note 2 | [Pan] Band Up |
| BTN3, short press | Note 3 | [Pan] Band Down |
| BTN4, short press | Note 4 | [RX] Mute |
| BTN2, long press | Note 12 | [RX] Tune Step Up |
| BTN3, long press | Note 13 | [RX] Tune Step Down |
| BTN4, long press | Note 14 | [RX] Toggle RIT |
| Jack tip, Normal paddle mode | Note 20 | [CW Key] Left Paddle (dit) |
| Jack ring, Normal paddle mode | Note 21 | [CW Key] Right Paddle (dah) |
| Jack tip, Extended paddle mode | Note 30 | [CW Key] Straight Key |
| Jack ring, Extended paddle mode | Note 31 | [TX] PTT |
Step 3 - Save the mapping
-
Click Save.
-
Keep the suggested folder and file name,
CTR2-MIDI.json. -
Click Save.
RimuSDR loads this mapping automatically the next time you connect the controller.
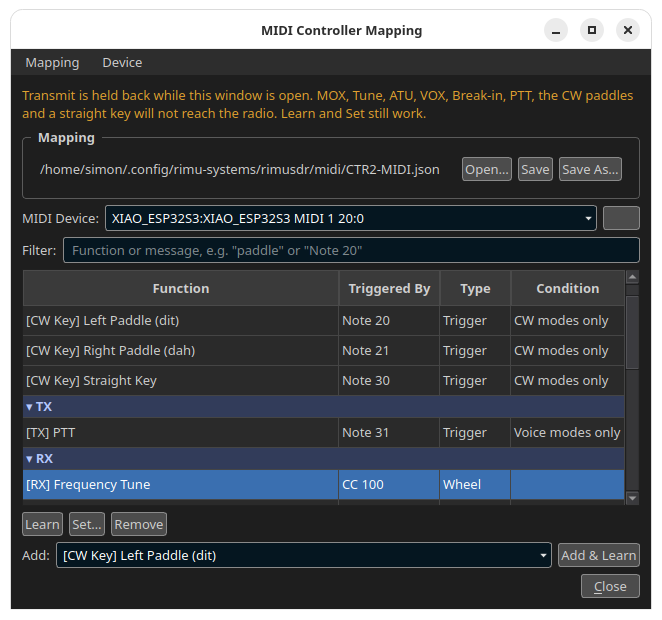
Step 4 - Set the paddle mode
The jack operates in two modes. The template covers both, so RimuSDR needs no change when you switch.
To toggle the mode, long-press the knob while the knob is in Home mode. The green LED shows the mode.
Paddles
- Connect the paddles to the jack.
- Set the paddle mode to Normal, with the green LED off.
- In the CW panel, set Iambic on.
Straight key and PTT switch
- Wire the straight key to tip and sleeve, and the PTT switch to ring and sleeve.
- Set the paddle mode to Extended, with the green LED on.
- In the CW panel, set Iambic off.
Step 5 - Test the controller
-
Connect to the radio.
-
Turn the knob. The frequency of the active slice changes.
-
Push and turn the knob. The AF gain changes.
-
Press BTN1 for less than one second. The slice mode changes.
-
Set the slice mode to CW, and set Iambic on in the CW panel.
-
Press a paddle.
-
Confirm you hear the sidetone.
The radio transmits with Breakin on
With Breakin on, the radio transmits each time you press a paddle. Connect an antenna or a dummy load first. Make sure the frequency is clear and that you are permitted to transmit.
-
To transmit, set Breakin on in the CW panel.
-
Press a paddle. The radio transmits.