Antenna Genius XL
The Antenna Genius XL (AGXL) is a 4O3A Signature networked antenna switch. Unlike the amplifier and the tuner, it does not connect to the radio. RimuSDR talks to it directly over your network.
That has two consequences worth knowing before you start:
- The switch works whether or not a radio is connected.
- It is not carried over SmartLink. RimuSDR needs a network path from this computer to the switch. For a switch at another site, use a VPN and a stored remote device.
Open the window from Settings › Antenna Genius....
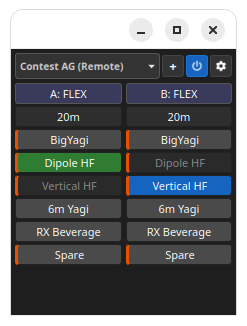
The window is deliberately narrow so it can sit beside the main window during a contest. Each port has its own column.
Connecting
The window opens with nothing but the top row, because the ports and antennas are only known once a switch is connected.
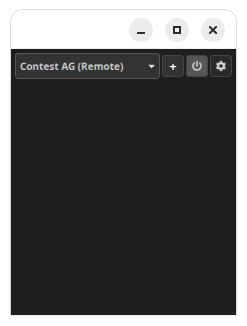
RimuSDR listens for Antenna Genius devices on your local network and lists what it finds in the drop-down at the top of the window.
-
Select the device in the drop-down at the top of the window.
-
Click the power button beside it.
The window fills in with the ports, bands and antennas the device reports. The same button disconnects again.
The row along the top holds everything to do with the connection:
| Control | Does |
|---|---|
| Drop-down | Selects the device to use. Discovered devices and stored remote entries appear together. |
| + | Opens Manage remote devices. See Remote devices. |
| Power button | Connects to the selected device, or disconnects. It is blue while connected. |
| Cog | Opens the device settings. See Device settings. |
RimuSDR tries to connect on its own when you open the window, if it has a device it connected to before. It gives local discovery about 3 seconds first, because reaching the same switch on your own network is better than going out over a stored address. Connecting yourself during that wait cancels it.
If a connection attempt fails, RimuSDR tries again every 5 seconds. A rejected password is the exception: retrying a wrong code fails forever, so RimuSDR stops and tells you instead.
Ports, bands and antennas
When a switch is connected, the window shows one column for each port below the top row. The left column is Port A and the right column is Port B. A single-port switch shows only the Port A column.
Each column controls its own port, and holds three kinds of button:
| Button | Shows |
|---|---|
| Band source | The port letter and where the port gets its band from, for example A: FLEX. |
| Band | The port's current band, for example 20m. |
| Antennas | One button for each antenna the port can use on that band. |
The screenshot at the top of the page shows a two-port switch with both ports following a FlexRadio on 20m. Port A has Dipole HF selected, and Port B has Vertical HF.
Band source
The band source button is at the top of each column. Its label is the port letter, then the source, so A: FLEX means Port A takes its band from a FlexRadio.
To change the band source of a port:
-
Click the band source button of the port.
-
Click the source you want in the menu. A check mark shows the current source.
RimuSDR sends the change to the switch. The button shows the new source when the switch reports it.
| Source | Band comes from |
|---|---|
| AUTO | The device decides. |
| FLEX | A FlexRadio bound to the port. See FlexRadio. |
| BCD | The BCD band input. |
| P2P | The point-to-point input. |
| MANUAL | You, using the band button below. |
Band
The band button is below the band source button, and shows the port's current band. What it does depends on the band source:
- In MANUAL, the button is slate blue, like the band source button. Click it to choose the band.
- In every other source, the switch sets the band for you. The button is dark gray, and a click does nothing. Both ports in the screenshot are in this state.
To select a band by hand:
-
Set the band source of the port to MANUAL.
-
Click the band button of the port.
-
Click the band in the menu.
The menu lists the bands defined on the Bands tab.
Antennas
The antenna buttons below the band button are the antennas the port can use on its current band. A click selects the antenna for the port whose column you click in.
To select an antenna for a port:
-
Find the column of the port. Port A is on the left. Port B is on the right.
-
Click the antenna in that column.
The click sets the receive (RX) or the transmit (TX) antenna, depending on what the port is doing:
- While the port is receiving, a click sets the RX antenna.
- While the port is transmitting, a click sets the TX antenna.
Clicking the RX antenna of the port again clears it, but only when the port has no band selected. With a band active the click is ignored, so a port is never left with a band and no receive antenna.
The color of an antenna button shows its state on that port:
| Appearance | Meaning |
|---|---|
| Green | The RX antenna of Port A. Only seen in the Port A column. |
| Blue | The RX antenna of Port B. Only seen in the Port B column. |
| Dark red | The TX antenna of the port, while the port is transmitting. |
| Mid gray | Free. Click it to select it for this port. |
| Dark gray, dimmed text | Cannot be selected on this port right now. |
A button is dimmed when:
- The other port holds the antenna, because the same antenna cannot be selected on both ports. In the screenshot, Dipole HF is dimmed in the Port B column because Port A holds it, and Vertical HF is dimmed in the Port A column because Port B holds it.
- The antenna cannot be used in the direction the port is working in on its band. For example, while the port is transmitting, every antenna that cannot transmit on the band is dimmed, including the port's own RX antenna.
- The port is inhibited. Every antenna in its column is dimmed until the switch clears the inhibit.
An orange bar down the left edge of a button means the antenna can transmit on the current band of that port. The bar also shows on dimmed buttons. It is not shown on the dark red TX antenna, or on any button while the port is inhibited. In the screenshot, every antenna except 6m Yagi and RX Beverage can transmit on 20m.
Antennas disappear, rather than gray out, for the wrong band
An antenna the port cannot use on its current band is hidden from the column altogether, so the list only offers antennas that suit the band in use. An antenna is hidden when it is set for neither TX nor RX on the band.
The in-band settings hide antennas too. While the port is not in in-band operation, antennas set for in-band use on the band are hidden. While it is, only those antennas are shown.
If an antenna you expect is missing, check its band settings on the Antennas tab.
Keeping the window in view
The window is separate from the main RimuSDR window, so it can be moved, or minimized out of the way, on its own.
Turn on Keep dialog on top of other windows, on the Device tab of the settings, to hold it above the main window while you operate. The preference is remembered between sessions.
Remote devices
Discovery only reaches the local network segment. To use a switch on another subnet, or at another site over a VPN, store it as a remote device.
Click + in the top row to open Remote devices, which lists the entries you have stored, each with its name and the address it dials.
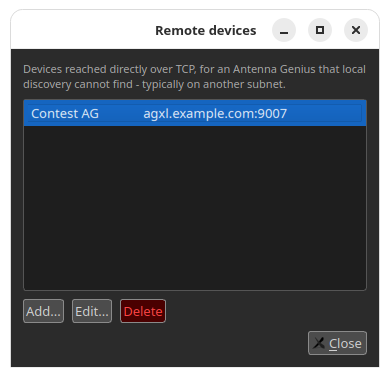
Click Add... to store a new one.
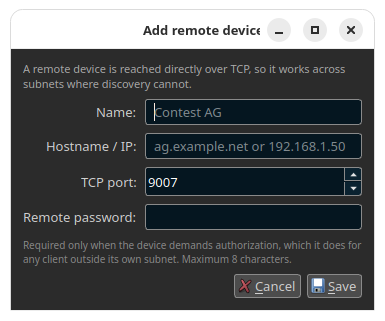
- Name
- Your name for the entry, such as
Contest AG. It identifies the entry in the device list, and it is what the drop-down shows, followed by (Remote). - Hostname / IP
- The address to connect to, such as
ag.example.netor192.168.1.50. - TCP port
- The device's control port. The default is 9007.
- Remote password
- Needed only when the device demands authorization, which it does for any client outside its own subnet. Maximum 8 characters.
Click Save to store the entry.
To change an entry, select it and click Edit.... The same dialog opens with the stored values filled in, and a Delete button for removing the entry.
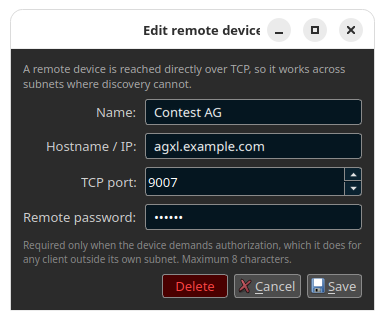
Deleting an entry removes its saved password as well.
A stored entry keeps its own hostname and password, so it is never replaced by a discovery message. If the same switch is also found on your local network, it is listed as a separate row.
A discovered device cannot hold a password
Discovery tells RimuSDR where a device is, but there is nowhere to keep a password for it. If a discovered device asks for one, add it as a remote device and put the password in that entry.
Device settings
Click the cog to open Antenna Genius Settings. The settings are read from and written to the switch itself, so a change made here affects every client that uses it.
Device
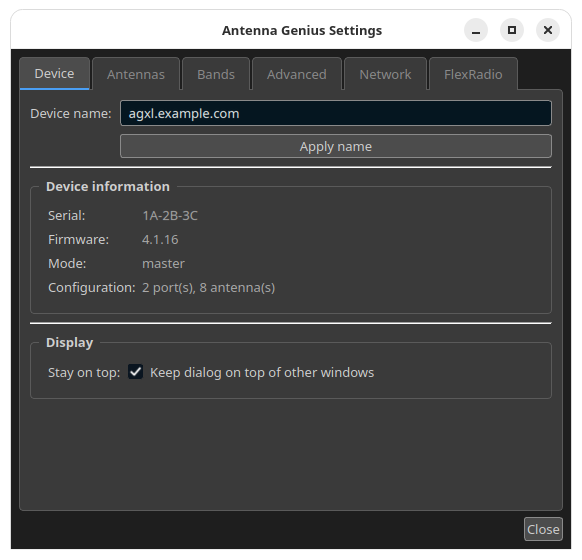
Shows the switch's serial number, firmware version, mode, and how many ports and antennas it is configured for. Type a new name and click Apply name to rename it.
This tab also holds Keep dialog on top of other windows, which is a RimuSDR preference rather than a device setting.
Antennas
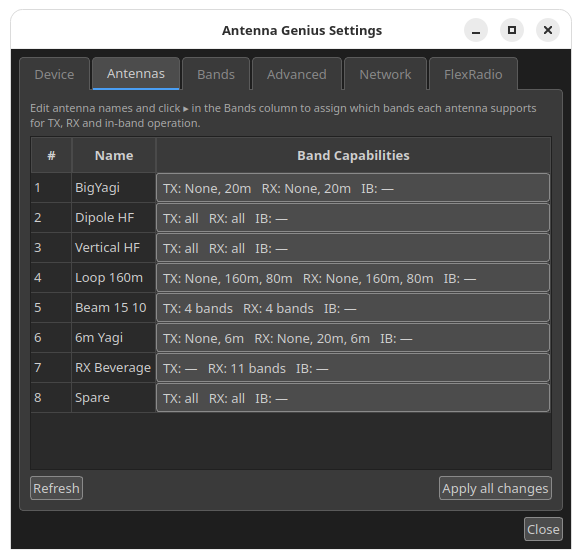
A table of the switch's antennas. Each row has a number, a name you can edit, and a summary of what that antenna is allowed to do.
The Band Capabilities column summarizes the bands in three parts:
| Part | Means |
|---|---|
| TX | Bands the antenna may transmit on. |
| RX | Bands the antenna may receive on. |
| IB | Bands the antenna may be used on for in-band operation. |
A dash means none, and all means every band. Where the list is long it is given as a count, such as 4 bands.
Click the ▸ arrow in the Band Capabilities column to open the band grid for that antenna and choose the bands for each of TX, RX and in-band. This is what decides whether an antenna appears on a port at all. In the screenshot above, Loop 160m is set for 160m and 80m only, which is why it is absent from the port columns when the port is on 20m.
Edit the names in the table, then click Apply all changes. Refresh re-reads the current values from the switch and discards edits you have not applied.
Bands
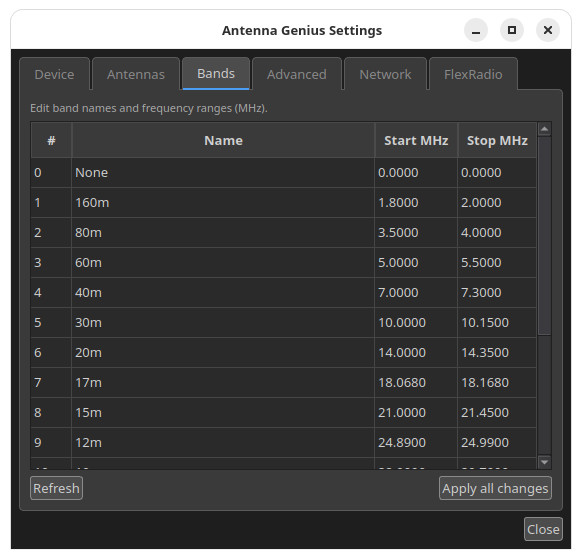
A table of band definitions, each with a number, a name, and a start and stop frequency in MHz. Band 0 is None, which is the band a port reports when it has no band selected.
Edit the values, then click Apply all changes. As on the Antennas tab, Refresh discards edits you have not applied.
Advanced
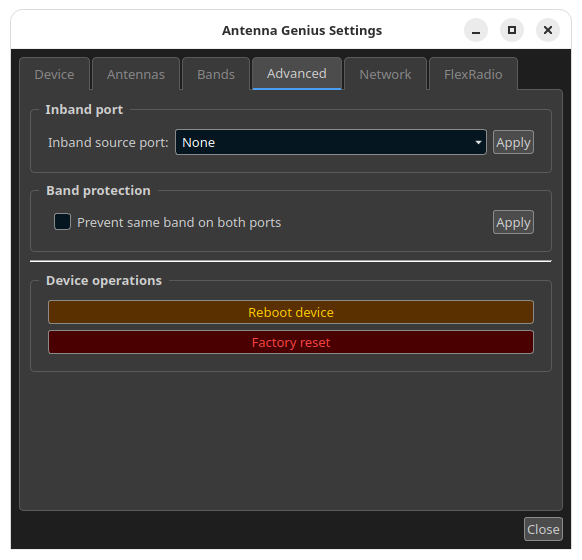
- Inband source port
- Selects which port provides the in-band signal, or None. Click Apply to send it.
- Prevent same band on both ports
- Stops both ports from selecting the same band at once. Click Apply to send it.
- Reboot device
- Restarts the switch. The connection drops and reconnects on its own.
- Factory reset
- Returns the switch to its factory settings.
Factory reset erases the configuration
A factory reset clears the antenna names, band capabilities, band definitions and network settings you have set up on the switch. There is no undo. Only use it if you intend to configure the switch again from the beginning.
Network
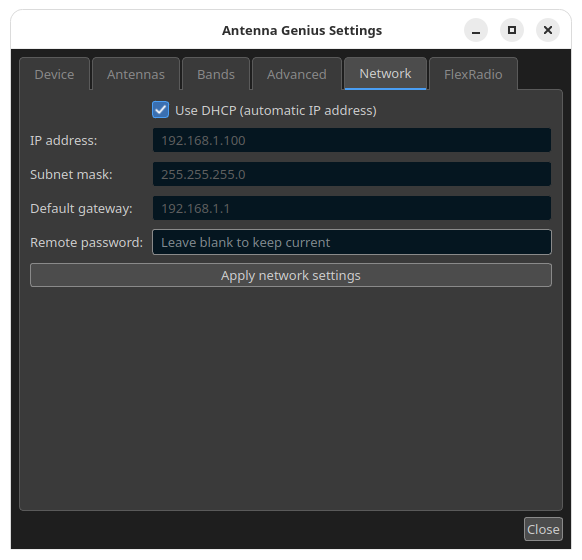
Sets how the switch gets its address. The address fields are only editable when Use DHCP is cleared, as the screenshot shows.
- Use DHCP (automatic IP address)
- When selected, the switch takes its address from your network. Clear it to enter a fixed address.
- IP address, Subnet mask, Default gateway
- Used when DHCP is off. Each must be a valid dotted-quad address.
- Remote password
- The password the switch demands from clients outside its own subnet. Leave it blank to keep the current password.
Applying network settings reboots the switch
Apply network settings restarts the switch and drops the connection. RimuSDR asks you to confirm first.
If you set a fixed address the computer cannot reach, you will have to recover the switch through its own front panel or a factory reset.
FlexRadio
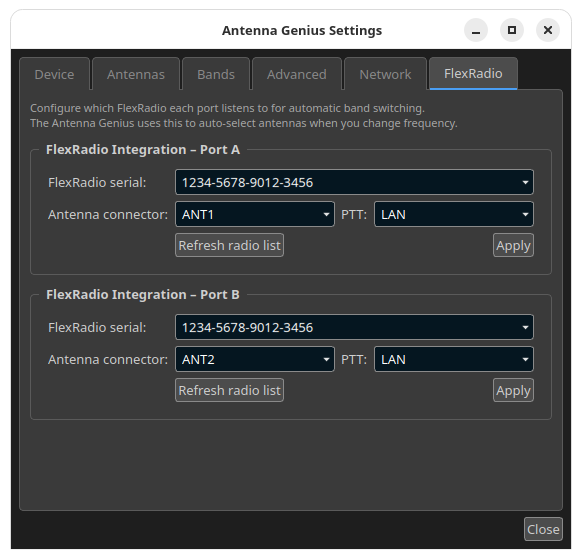
Binds a port to a FlexRadio so the switch follows the radio's band, and selects the antenna for you when you change frequency. Each port is configured on its own.
Both ports can be bound to the same radio, on different connectors. That is the usual setup for a single radio using two antenna ports, and it is what the screenshot shows.
- FlexRadio serial
- The radio to bind to the port, or (none). Click Refresh radio list to ask the switch what radios it can see.
- Antenna connector
- Which of the radio's connectors this port is wired to: ANT1, ANT2 or XVRT.
- PTT
- How the switch learns that the radio is transmitting: LAN over the network, or RCA over a wired connection.
Click Apply to send the settings for that port.
Set the port's band source to FLEX to have it follow the bound radio. See Band source.
Troubleshooting
- The window reports Prologue timeout and keeps retrying
- The switch accepted the connection but never identified itself. Some Arduino-based Antenna Genius compatible devices wait for a carriage return before they answer. Turn on Send initial CR+LF on connect on the External tab of Radio Setup, then connect again. See Radio Setup - External.
- The device asks for a password
- The switch demands authorization from any client outside its own subnet. Add the switch as a remote device and put the password in that entry. A discovered device has nowhere to keep one.
- The password is rejected
- RimuSDR stops retrying, because a wrong code fails every time. Click +, select the entry, click Edit..., correct the Remote password, then connect again. The password is at most 8 characters.
- The device is not in the list
- Discovery only reaches the local network segment. Add the switch as a remote device with its address.